Documentation Index
Fetch the complete documentation index at: https://docs.amplication.com/llms.txt
Use this file to discover all available pages before exploring further.
Define Roles
Roles represent different user types within your application, each with specific access levels. Amplication provides a defaultUser role, and you can easily create new roles to match your organization’s structure and access requirements.
Navigate to Roles
Navigate to your resource and click Roles in the main navigation bar. This will take you to the Roles page, where you can view and manage all roles in your resource.
Access Permission Levels
With roles defined, you can now configure permissions for your entities. Amplication offers flexible permission settings for each action that can be performed on an entity: View, Create, Update, Delete, and Search. There are three levels of access you can grant:- Public: No authentication is required. Anyone, even users without defined roles, can perform the action. Use this cautiously, typically for publicly accessible data.
- All Roles: All defined roles in your Service can perform the action. This is a broad permission level suitable when all authenticated users should have access.
- Granular: This provides fine-grained control. You can specify exactly which roles are allowed to perform the action. This is ideal for enforcing specific access policies and the principle of least privilege.
Configure Entity Permissions
Entity permissions control who can perform actions on entire entities. Let’s configure permissions for the “Project” entity as an example.Navigate to Entity Permissions
- Click the Entities icon in the main menu (left sidebar).
- Select the Project entity from the list.
- Click the Permissions tab within the Project entity page.
Set Entity Action Permissions
For each action (View, Create, Update, Delete, Search):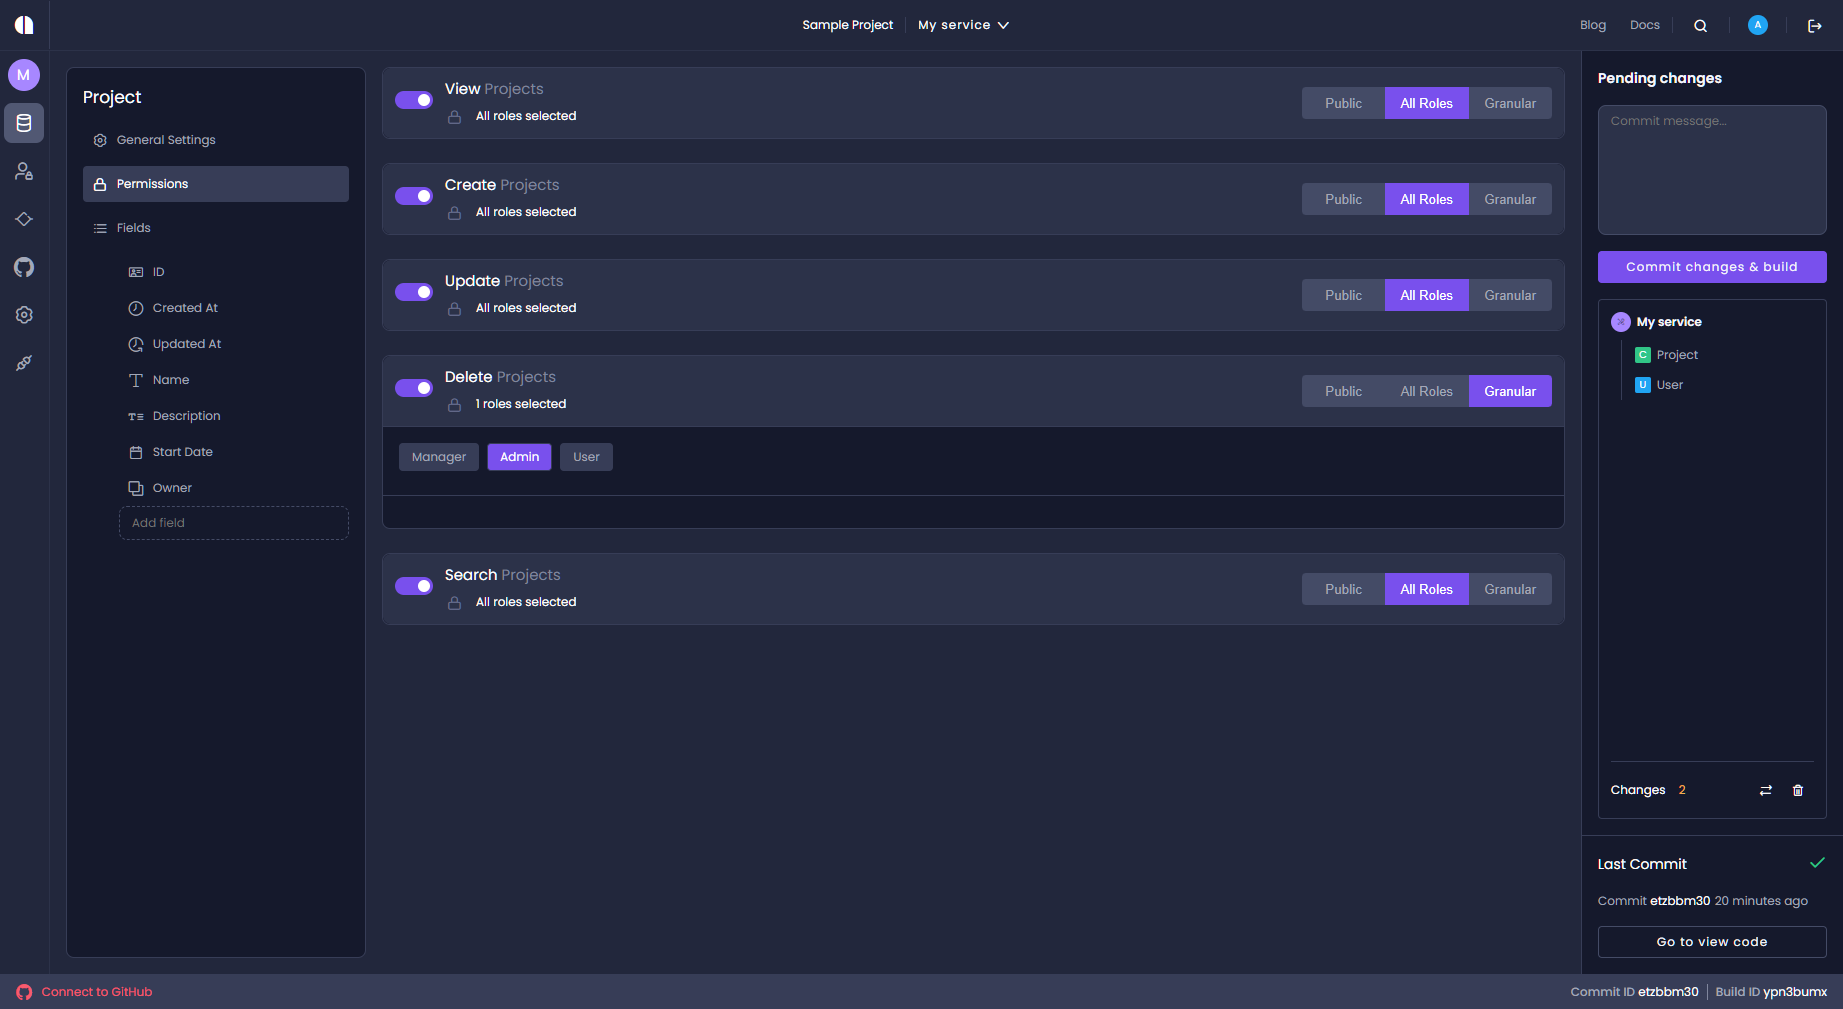
- Choose the desired permission level from the dropdown: Public, All Roles, or Granular.
- If you select Granular, a list of roles will appear. Select the checkboxes next to the roles you want to grant permission to for that specific action.
- View and Search are set to All Roles, allowing any authenticated user to view and search projects.
- Create and Update are also set to All Roles for broader access in this example, but you might restrict these to specific roles like “Manager” in a real-world scenario using Granular permissions.
- Delete is set to Granular and restricted to the Admin role only, ensuring only administrators can delete projects.
Configure Field Permissions
For even more precise control, you can set permissions at the field level. This allows you to restrict access to specific fields within an entity based on roles.Access Field Permissions
Within the Permissions tab of your entity (e.g., “Project”), locate the action you want to configure field permissions for (e.g., Update).
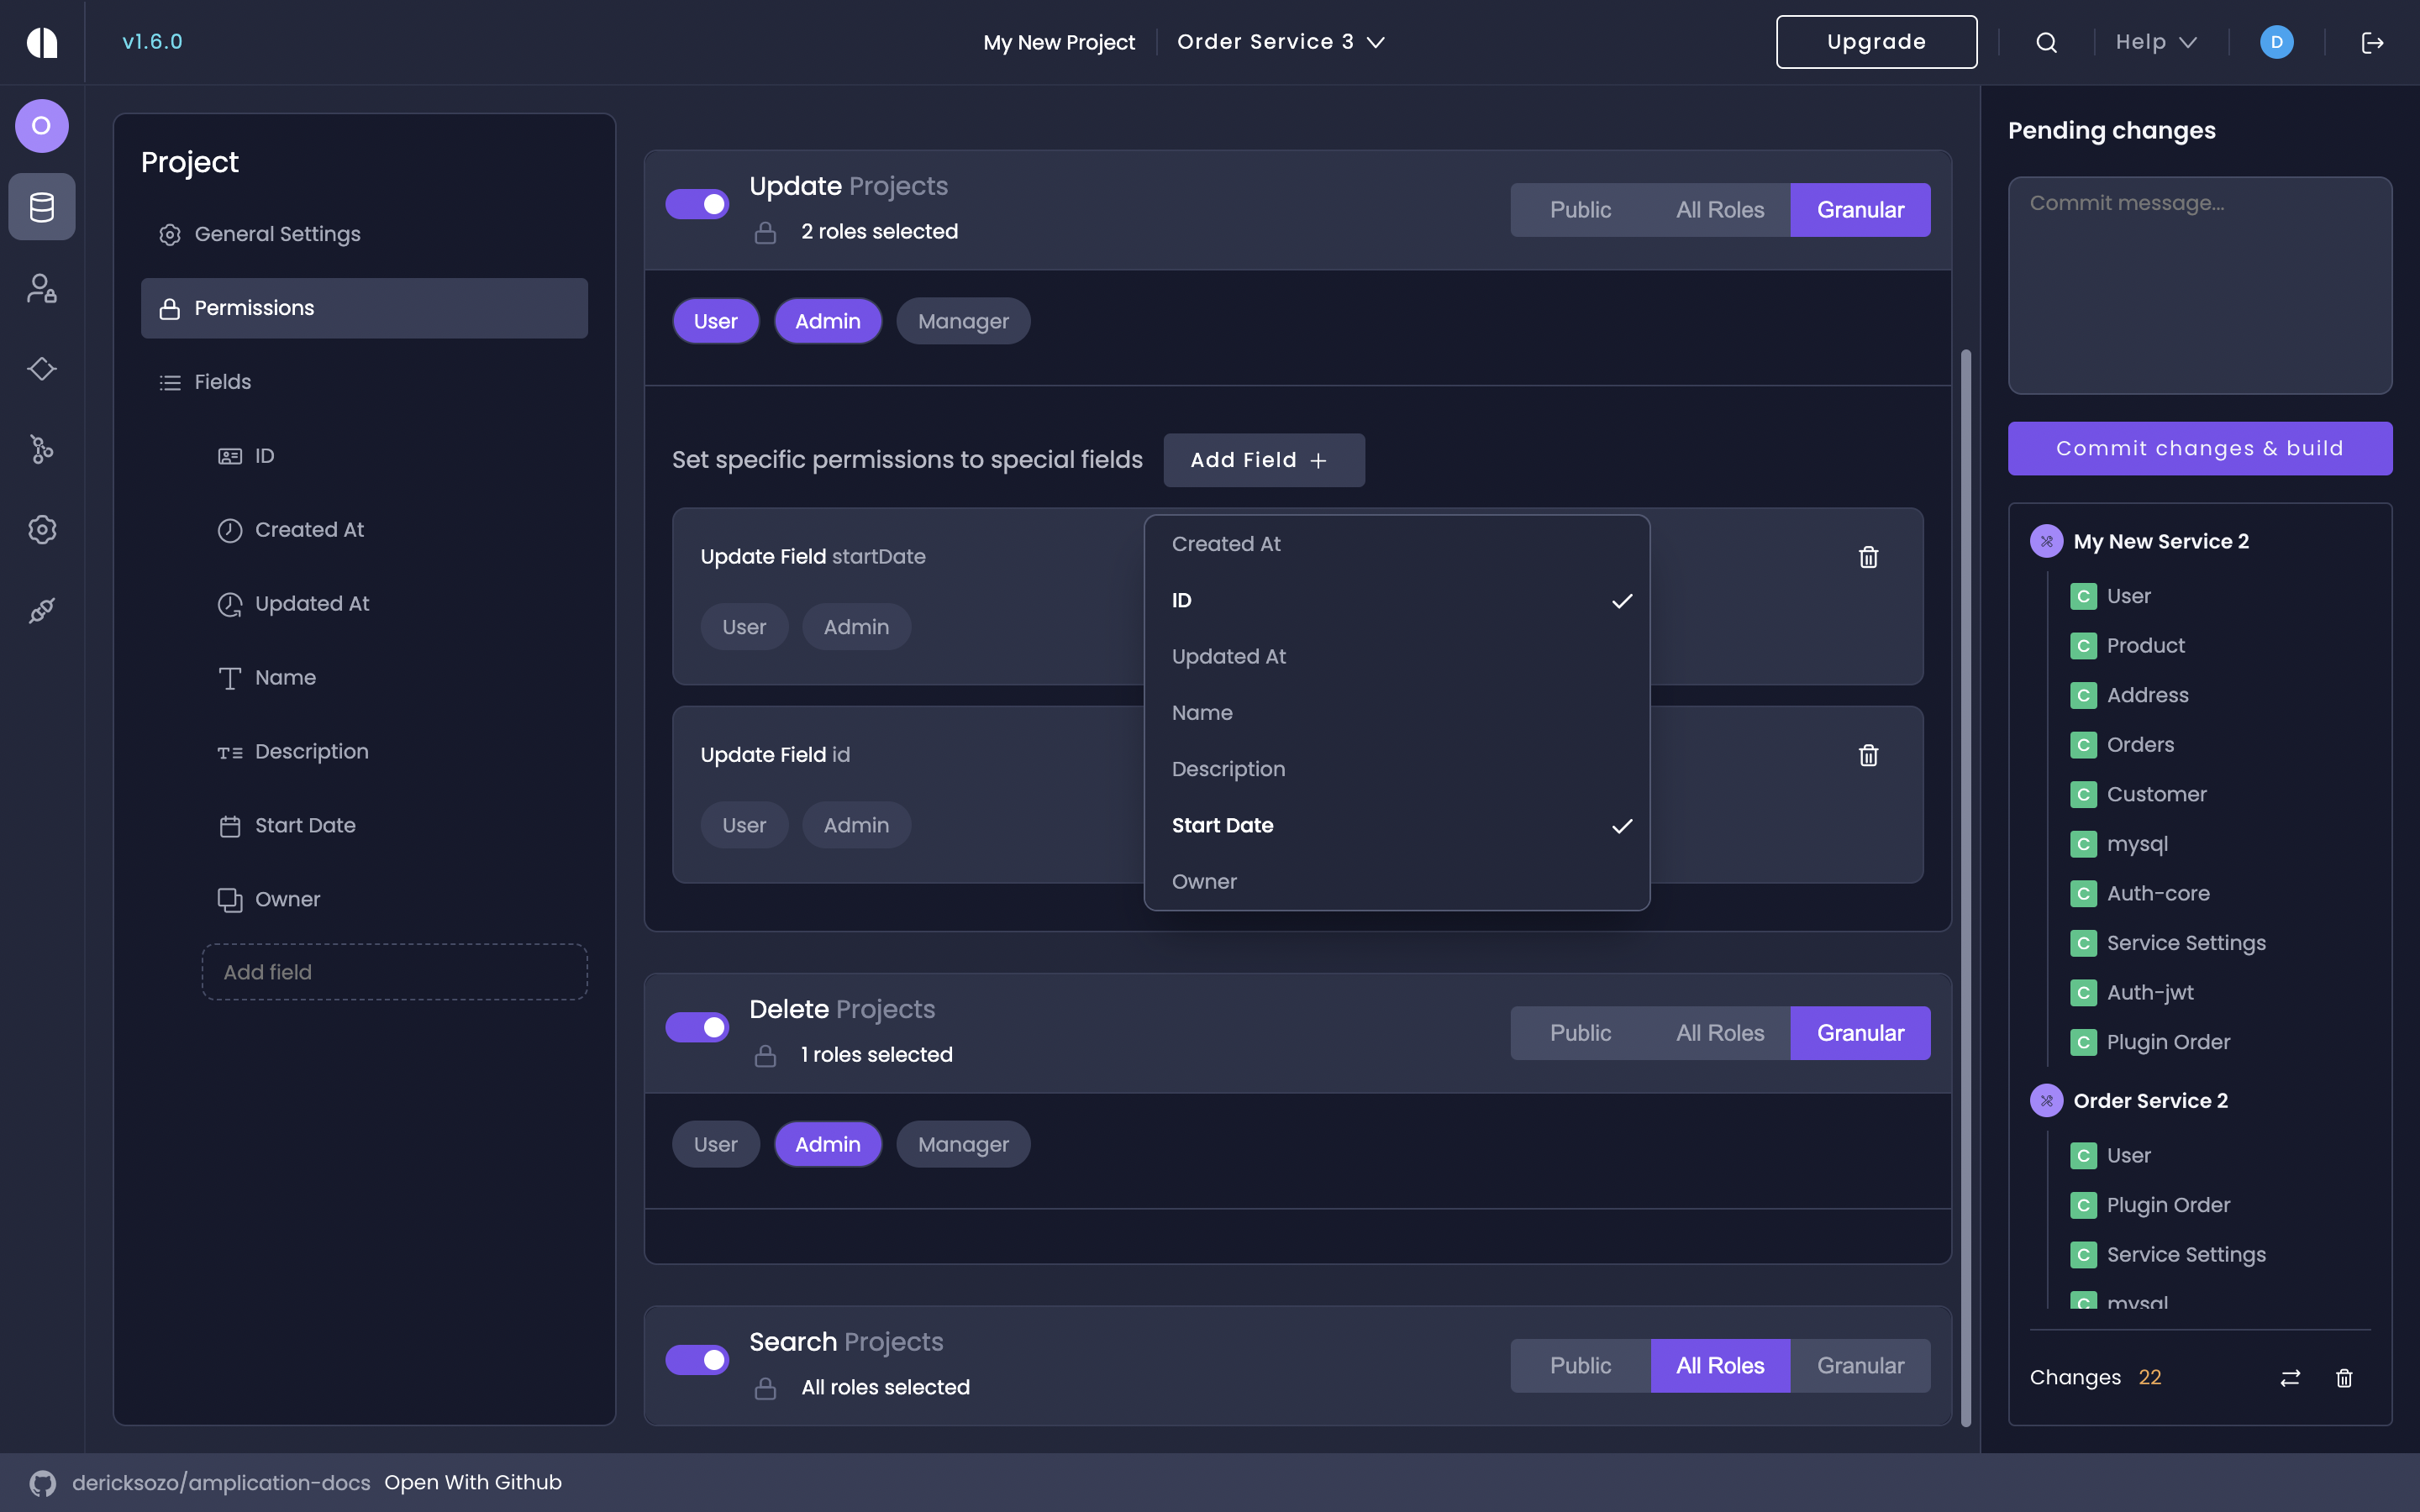
Add Fields and Set Permissions
- For the selected action (e.g., Update), click + Add Field.
- Choose the field you want to configure permissions for from the dropdown list (e.g., “Start Date”, “ID”).
- Select the roles that should have access to this field for the chosen action. You must first ensure the desired roles are selected at the action level (e.g., “Admin” and “Manager” roles are selected for the “Update” action in the example below).
- Admin role is granted permission to update the startDate field.
- Both Admin and Manager roles are granted permission to update the id field.
Next Steps
By using Amplication’s role-based access control, you can confidently build robust and secure enterprise apps, focusing on delivering business value while Amplication handles the complexities of permission management. Next, you’ll want to:Commit Your Changes
Learn how to commit your configuration changes to your Git repository and maintain version control of your application.
Generate Code
Build and deploy your resource to apply the permission settings and make your changes live in your application.